After I log into Windows 7, I select and right click to copy a file and try to paste the file, the paste options are not working. Similarly Ctrl-C and Ctrl-V also doesn't work.
To solve the problem, just turning off the shared clipboard feature.
Saturday, August 21, 2010
Thursday, March 4, 2010
External HDD not working
I had connected an external hard drive to my computer, but it stopped working in Windows 7. Then suddenly it started working and my dvd drive stopped. Now External HDD not working again! my dvd is working but my HDD isn't. It doesn't come up in device manager.
I don't know how to fix it.
I don't know how to fix it.
Saturday, February 27, 2010
How to print windows 7 sticky notes
Windows 7 Sticky Notes is very useful for me. You can write down your notes and change the fonts or colors of the note, but how to print sticky notes in windows 7. When Right-click on a note, I con't find out printing function in the menu.
It's necessary to copy the note text into MS Office Word or WordPad to print for me. But it's an extra step. MS will add that feature in sticky notes.
To get printing function in notes, you can use Microsoft Office OneNote 2003. You can print a page of notes by clicking Print on the Standard toolbar in OneNote.
How to Import Pictures from Camera in Windows 7
Most digital cameras can easily transfer pictures and videos to your computer by using Windows 7’s built-in software.
How to Import Images from a Camera in Windows 7.
1. First plug your camera’s cable into one USB port in your computer. Turn on the camera and set it to display mode.
2. Windows 7 will recognize it. Waiting a few seconds. If your camera cann't be recognized by Windows 7, unplug the cable from PC and plug it back in.
3. When Windows 7 recognizes your camera, you can see the AutoPlay window. There are 2 Device options for you to select: "Import pictures and videos", "Open device to view files". You should click "the Import Pictures and Videos" option in the window and Windows 7 start to grab your camera’s pictures.
4. Now "the Import Pictures and Videos box" appears. Type a name to tag your pictures(It's optinal). Click the Import button. Windows 7 brings your camera’s photos and renames them. If you need to change how Windows 7 imports your photos, just click the Import Setting links in the bottom left corner.
5. Check the Erase After Importing box. It can help you free up your camera for more photos.
6. When finish importing photos, Windows 7 will display your new pictures's folder.
Thursday, February 25, 2010
Disable searchprotocolhost.exe high cpu
I has found that Searchprotocolhost.exe in Windows 7 is running all of the time and uses high cpu or memory, such as using up to 36% of CPU. searchprotocolhost.exe is slowing down my old computer.
what is Searchprotocolhost.exe? It is Windows Search Protocol Host which is created by Microsoft Corporation and located in the C:\Windows\System32 folder.
How to safely disable searchprotocolhost.exe or stop searchprotocolhost running?
Type services into the search box and press enter --> Double-click the Services(Local) --> look for Windows Search --> Right-click it --> choose properties --> click stop. Change startup type to disable then click apply.
Disable searchindexer.exe in Windows 7
SearchIndexer.exe (Microsofts Windows Search Indexer) in Windows 7 is the powerful windows search, but sometimes it uses a amount of CPU Usage and may utilizes near 100% CPU usage. Looking at the Resource Monitor the process 'Searchindexer.exe' is getting High CPU. So you need to disable or Delete SearchIndexer.exe to stop Windows Enhanced Search.
How to disable searchindexer.exe in windows 7.
* Click Start Button --> Control Panel --> Programs and Features --> Turn Windows Features on or off.
* Clear the Indexing Service's chek box on the "Windows Features" window and click ok.
Now you turn off Windows Search's Index service and Windows 7 still has its simple search functionality.
Tuesday, February 23, 2010
Index Your Files
Do you need the software which can index and search through all your files or folders on Local or Networked Drives. Try Index Your Files 5.0.0.5. It can help you to find your files and show them to you in computer with less memory.
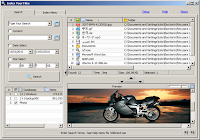 Index Your Files does not contain any malware, or similar, and does not write to the registry. It is Easy, Small, Portable App and Powerful.
The Main Features
* Instantly search files by name, date, size, or wildcards
* Supported Operating System: Windows NT 4.0 2000 XP Vista and Windows 7
* Support for Boolean operators
* Taskbar icon for quick access
* Arrange results by name , folder, extension, date, size
* Search in various directories or LAN resources
* Easy to use, Explorer like user interface
* Database management (create several databases)
* Easy & Fast Search Engine - Easy & Fast Index Engine
* Index & Search in Background
* Full Information Search and Index
* Compress - Database Index
* Drag & Drop
* Context Menu Shell Extensions
* View common filetypes within search window, displays .pdf . swf .htm .html .jpg .png .txt etc.
Subscribe to:
Posts (Atom)